
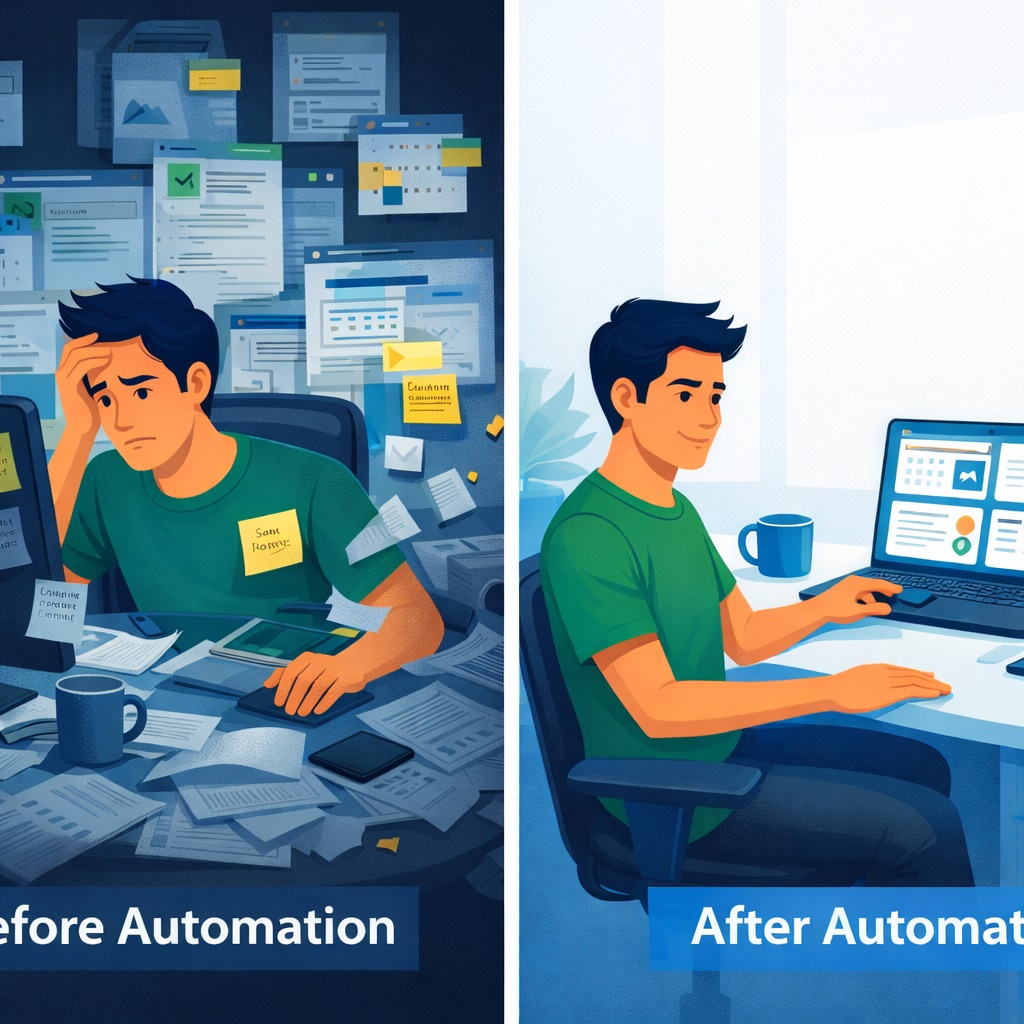
It’s 11 PM on a Friday. You’ve been “working” for 14 hours, but only 6 were billable.
The other 8 hours? They vanished into a black hole of admin tasks you can’t even remember doing.
Sound familiar?
You’re about to discover why the freelancers making six figures aren’t more talented than you—they’ve just stopped doing work that software can handle for free.
## Quick Answer: How Do I Automate Client Onboarding?

Automate freelance client onboarding in 5 steps:
1. Create an intake form in Dubsado (free for 3 clients)
2. Build a contract template with auto-fill fields
3. Set up an automation workflow that triggers on form submission
4. Configure email sequences (welcome, questionnaire, contract, reminders)
5. Create a client portal for centralized communication

Total setup time: 90 minutes. Time saved per client: 2+ hours.
The answer you need right now: You’re losing 15-20 hours every week to tasks that could run themselves. This three-part series sThe answer you need right now: You’re losing 15-20 hours every week to tasks that could run themselves. This three-part series on freelance business automation shows you exactly how to automate:
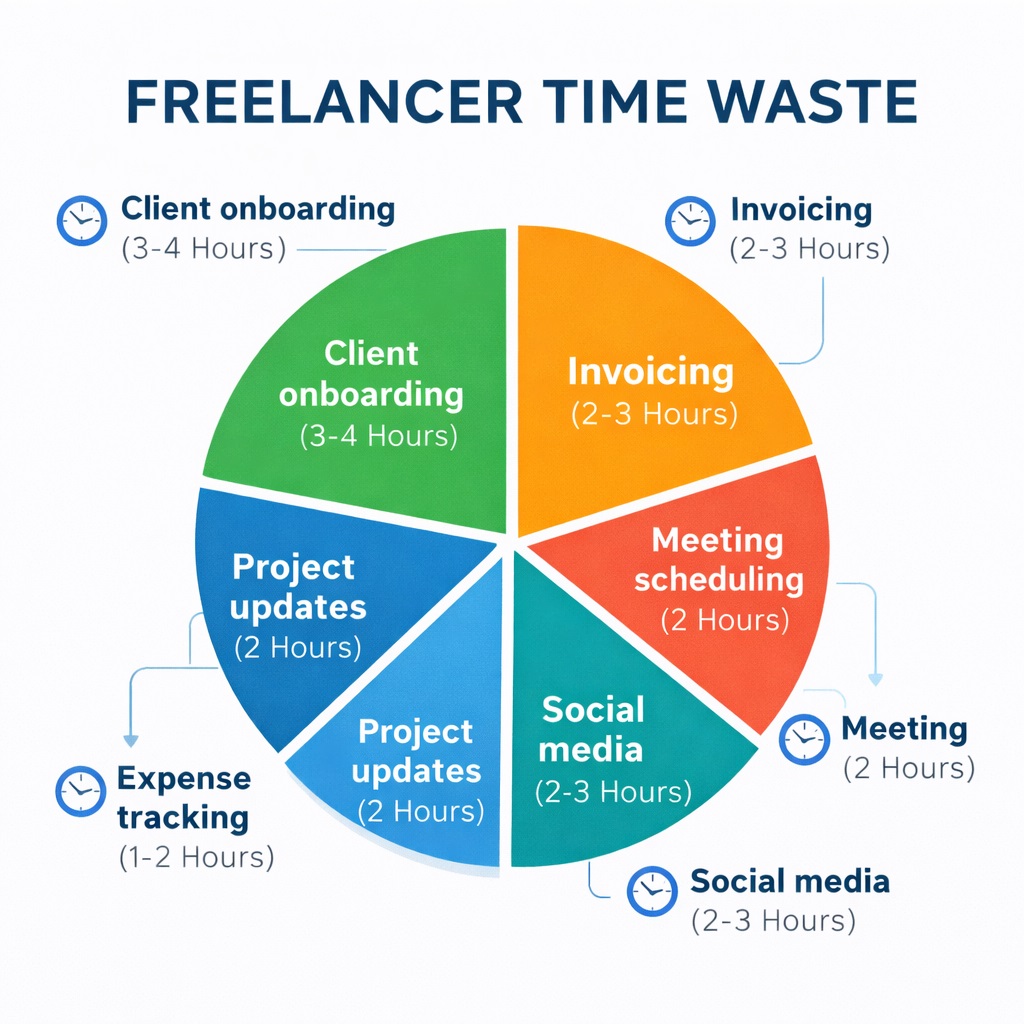
- Client onboarding automation (saves 3-4 hours/week)
- Invoicing and payment reminders (saves 2-3 hours/week)
- Meeting scheduling (saves 2 hours/week)
- Project status updates (saves 2 hours/week)
- Social media posting (saves 2-3 hours/week)
- Expense tracking (saves 1-2 hours/week)
- File organization (saves 1-2 hours/week)
These seven automations require zero coding skills, cost less than $30 monthly, and can be set up in under six hours total.
In Part 1, we’ll tackle the foundation: freelance client onboarding automation that transforms how professional you appear while saving hours every single week. This comprehensive guide to automating your freelance onboarding process shows you exactly how to set up automated client intake forms, contract automation, and follow-up sequences—eliminating 8+ hours of manual work monthly.
According to a 2024 study by Workmarket, freelancers spend an average of 16.4 hours per week on non-billable administrative tasks. That’s 40% of a standard work week vanishing into busywork.
But here’s what nobody tells you: nearly all of it can run on autopilot through freelance workflow automation.
I’m not talking about someday, when you’re “successful enough” to hire help. I mean today, with free or cheap onboarding automation tools you already have access to. The freelancers making six figures aren’t necessarily more talented than you—they’ve just stopped doing work that software can handle.
This guide walks through seven specific automations that collectively save 15+ hours weekly. Each section includes:
- The exact setup process with client onboarding workflow templates
- Recommended automation tools for freelancers with real pricing
- Actual time calculations
- Copy-paste templates you can use immediately
Nothing here costs more than $30 per month, and most of it is free.
You’ll know exactly which automation to tackle first, how long setup will take (honest estimates, not optimistic ones), and what your automated client onboarding workflow will look like once it’s running. No theory, no fluff—just the systems working freelancers use to reclaim their time.
The transformation starts with understanding where your hours actually disappear to.
What is Freelance Client Onboarding Automation?
Freelance client onboarding automation is the process of using software tools to automatically handle repetitive onboarding tasks—from sending automated questionnaires to collecting digital signatures to creating client portals. Instead of manually managing each new client through a 12-step process, client onboarding automation reduces your involvement to just 10 minutes of review time per client.
Key components of an automated client onboarding process include:
- Automated client intake forms that send themselves when leads inquire
- Smart contract templates that auto-fill with client information
- Client onboarding workflow sequences that trigger follow-up emails automatically
- Digital client portals that organize all project files in one place
- Electronic signature collection that happens without manual reminders
- Automated welcome sequences that educate clients about your process
The result? You transform from spending 2+ hours onboarding each client to spending just 10 minutes—while appearing more professional than ever through your client onboarding system.
Why client onboarding automation matters for your freelance business:
Modern contract management for freelancers isn’t about replacing the human touch—it’s about eliminating repetitive freelance administrative tasks so you can focus on relationship building and actual client work. When you automate your freelance onboarding process, clients experience faster response times, clearer communication, and a more professional experience from day one.
Understanding the Freelance Time Drain
MMost freelancers can tell you their hourly rate down to the dollar. Few can tell you what percentage of their week is actually billable.
That gap is where your income is hiding.
Where Your Hours Actually Vanish
Let’s break down where 15+ hours realistically disappear each week through manual client intake processes and other administrative tasks:
Client onboarding takes 3-4 hours:
- Sending the intake form manually
- Answering clarifying questions
- Sending the contract
- Negotiating clause changes
- Chasing electronic signatures
- Following up on payment invoices
- Sending welcome materials to your client portal
By the time everything’s done, a simple onboarding has eaten up half a workday spread across two weeks. This is exactly what a proper client onboarding workflow template eliminates.
Invoice creation and follow-ups consume 2-3 hours:
- Creating invoices (15 minutes each)
- Tracking who’s paid and who’s late
- Crafting uncomfortable “just checking in” emails
- Rewriting those emails four times to strike the right tone
FreshBooks reported in their 2023 survey that the average freelancer sends 3.2 payment reminders per invoice.
Scheduling back-and-forth costs 2 hours:
- “I’m free Tuesday or Wednesday afternoon”
- “I’m only available in the mornings”
- “Actually, can we do Thursday?”
The average scheduling exchange takes 8-12 messages to lock down a single 30-minute call. Multiply that across four client calls per week, and you’re looking at hours of calendar Tetris.
Project status updates take 2 hours:
- Writing “Here’s where we’re at” emails
- Creating progress reports
- Answering “quick question about the timeline” messages that are never actually quick
- Explaining the same progress to multiple stakeholders
Social media posting eats 2-3 hours:
- Opening LinkedIn, staring at the blank box
- Writing something, deleting it, rewriting it
- Reformatting for Twitter
- Remembering Instagram exists
- Giving up entirely
Expense tracking takes 1-2 hours:
- Receipts in your email
- Paper receipts in your wallet
- That subscription charge you forgot to categorize
- Digging through six months of bank statements at tax time
File organization costs 1-2 hours:
- “Did I call it ClientName_Final or FinalVersion_ClientName?”
- Downloading files, forgetting to move them out of Downloads
- Searching for files you know exist somewhere
- Downloading the same file twice because you can’t find the first one
Add it up: 15.5 hours on the low end, 19 hours on the high end. Nearly half your work week isn’t work at all.
The Billable Hours Gap
The freelancers who break into six-figure territory aren’t putting in more hours. According to Upwork’s 2024 Freelancing in America study:
- Top earners work: 36 hours per week on average
- Their billable percentage: 85-90%
- Struggling freelancers work: 40+ hours per week
- Their billable percentage: 50-60%
The difference isn’t effort. It’s efficiency through freelance workflow automation.
Why Smart People Resist Automation
HerHere’s the psychological trap that keeps freelancers stuck:
“Automation feels impersonal”
You think: “My clients expect a personal touch. Client onboarding automation will make me seem like just another vendor.”
That’s backwards. Automated client onboarding handles the logistics so you can spend time on things that actually feel personal. Your clients don’t want personal invoice reminders—they want their questions answered thoughtfully. They don’t care if your client intake process is automated—they care that getting started with you is easy.
“I don’t have time for the upfront investment”
Setup takes time, and when you’re already drowning, spending an hour configuring an onboarding automation tool feels impossible.
But this is the 10x ROI principle: one hour of setup saves ten hours monthly. Spend six hours this weekend setting up your client onboarding system, and you break even by mid-month. Then you pocket 40+ hours of freedom in the next three months.
“I’m overwhelmed by choices”
You search “freelance automation tools” and get hit with 47 different options, each claiming to be essential. You read three articles that contradict each other. You give up and go back to manual work because at least that’s familiar.
This guide eliminates the overwhelm by giving you exactly one recommended client onboarding tool per task.
Your Automation Decision Framework
Before we dive into setting up your automated client intake system, here’s how to decide what to automate:
Automate it if:
- You do it more than three times per week
- It follows predictable, repeatable steps in your client onboarding checklist
- Eliminating it would immediately free billable hours
- It doesn’t require nuanced judgment or creative thinking
- Clients won’t notice the mechanics (they’ll just see better results)
Keep it manual if:
- It’s a genuine relationship touchpoint (thank you notes, celebration messages)
- It requires reading between the lines or emotional intelligence
- You do it less than once a month
- The setup time exceeds the time you’d save in a year
- It’s part of your unique value proposition
Now let’s get into the first automation that will transform how clients perceive you from day one.
Automation #1: Client Onboarding & Contract Signing
Time Lost Without Automation: 3-4 hours per week
The first impression you make on a new client shouldn’t be you chasing them for basic information through a disorganized client intake process.
The Problem You’re Solving
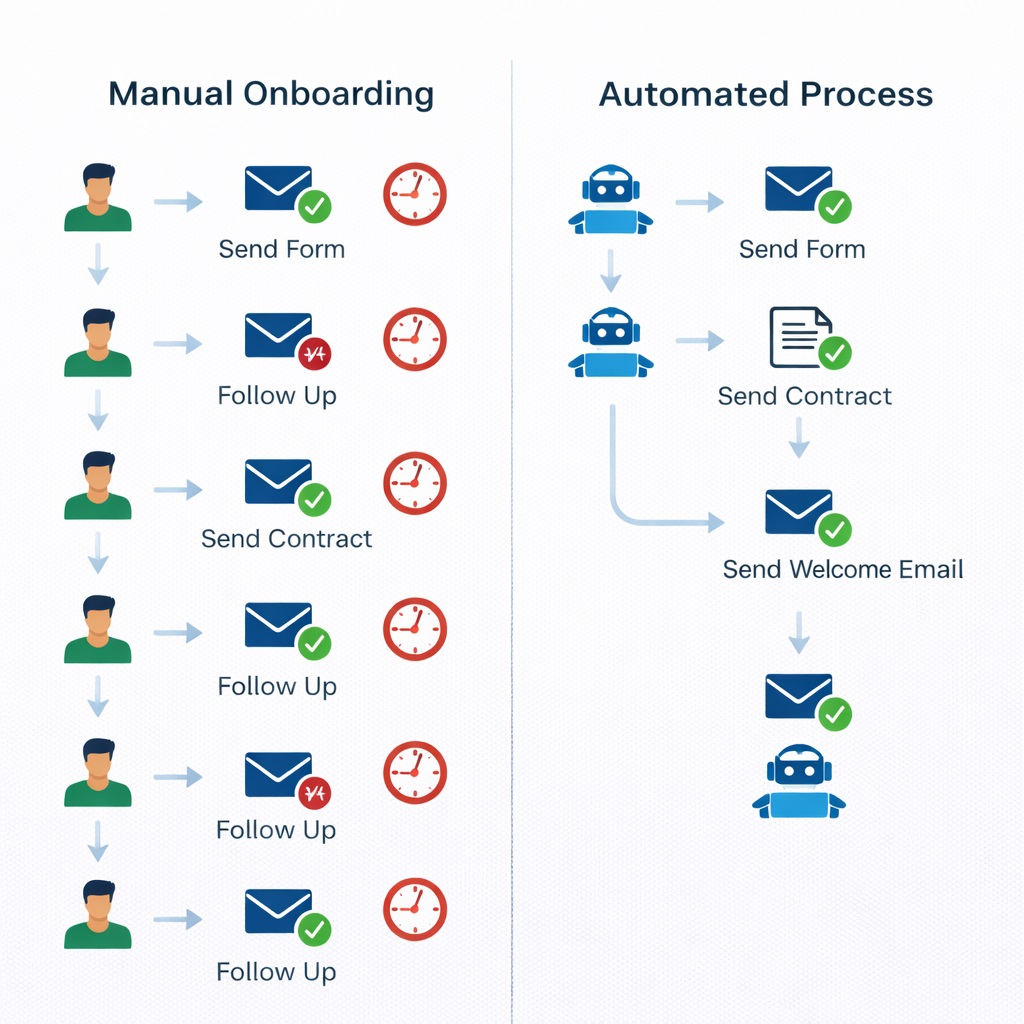
Right now, your client onboarding process probably looks like this:
- A lead comes in
- You send them a questionnaire (manually)
- They respond with half the answers
- You follow up for the rest
- Eventually you have everything
- You create a contract, personalize it, send it
- They have questions
- You answer
- They say they’ll sign tonight
- Three days later you’re following up for signatures
- Finally they sign
- Now you send the welcome packet, create their project folder, explain your process
Each new client is a week-long project before work even starts. This manual client onboarding workflow is costing you hours.
The Automated Version
Here’s what happens with freelance client onboarding automation instead:
- Lead fills out your contact form
- Within two minutes, they receive a welcome email with your process guide
- They get a link to the automated intake questionnaire
- When completed, your system auto-generates a personalized contract
- Contract is sent for electronic signature automatically
- Once signed, they’re added to your client portal with all project docs
- You get a notification that they’re ready to start
Your involvement: Maybe ten minutes of review.
That’s the difference between spending four hours per client on onboarding versus fifteen minutes with client onboarding automation.
Best Client Onboarding Tools for Freelancers
For effective freelance client onboarding automation, you need a platform that handles forms, contracts, and workflows in one place. Three solid onboarding automation tools for your client onboarding system:
Dubsado
- Cost: Free for up to 3 clients, then $20/month
- Best for: Service providers who want comprehensive client onboarding automation
- Pros: Most features, handles complex automated workflows
- Cons: Steeper learning curve
HoneyBook
- Cost: $16/month after trial
- Best for: Creative freelancers (designers, photographers, planners)
- Pros: Beautiful client onboarding templates, easier to learn
- Cons: Less customization than Dubsado
Notion + DocuSign
- Cost: Free tiers available for both
- Best for: People already living in Notion
- Pros: Keep everything in one ecosystem, good for digital client management
- Cons: Requires more manual setup of automation workflows
I’m walking through Dubsado workflow setup because it handles the most complexity with the least effort, but the principles transfer to any client management platform.
Step 1: Building Your Intake Form
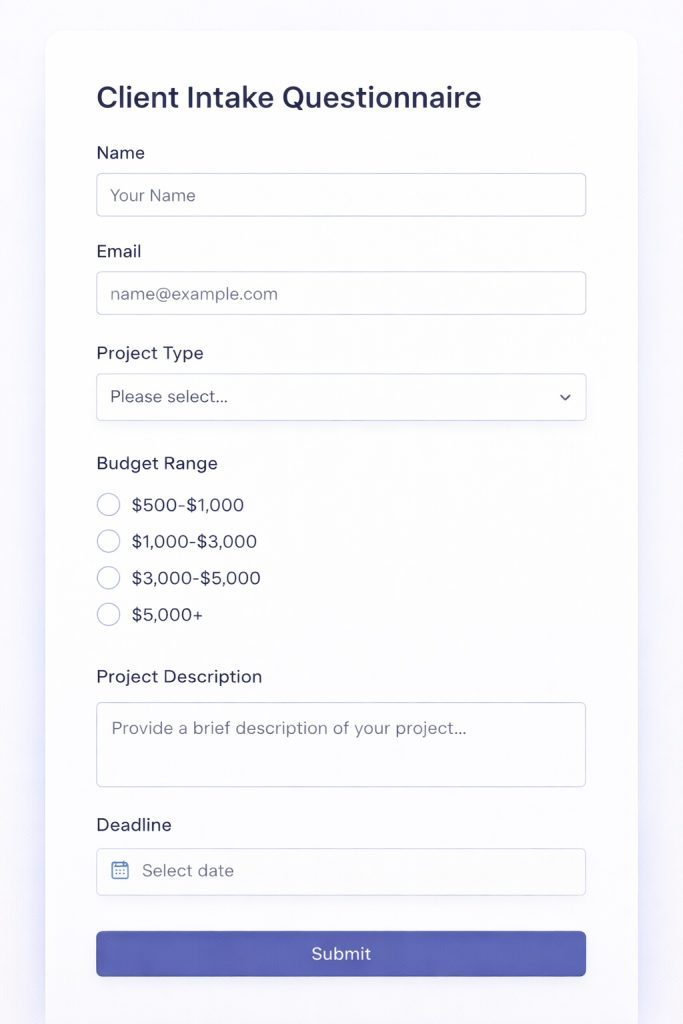
Start by listing every piece of information you need before starting work. Don’t ask for things “just in case”—every question is friction in your client intake form.
Essential questions to include in your client onboarding questionnaire:
- Contact basics
- Name
- Company
- Phone
- Project specifics
- What they need
- Deadlines
- Budget range
- Current situation
- What they’ve tried
- What’s not working
- Success criteria
- What does “done” look like to them
- Attribution
- How they found you (helps you double down on what’s working)
In Dubsado (setting up your automated questionnaire system):
- Go to Forms → Create New Form → Start from Scratch
- Add your questions as form fields
- Use the right field types for your digital intake form:
- Dropdown menus for defined options (budget ranges, project types)
- Text boxes for open responses
- Conditional logic to show/hide questions based on answers
Example of conditional logic in your client onboarding form:
If someone selects “Website Design” as their project type, the automated form reveals:
- Questions about their current site
- Brand guidelines availability
- Target audience details
If they select “Content Writing,” they see:
- Tone preferences
- Target keywords
- Content goals
This keeps your client intake forms short while gathering detailed information.
Pro tip: Add a “What questions do you have for me?” field at the end of your onboarding questionnaire. This surfaces concerns upfront instead of during contract negotiation.
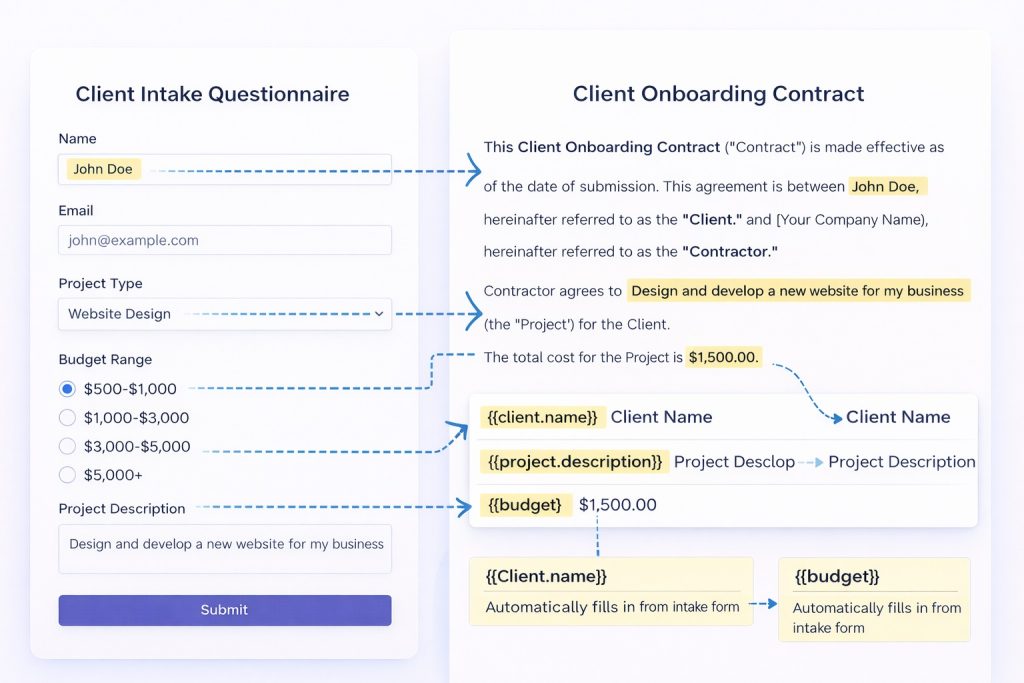
Step 2: Creating Your Contract Template
Your contract needs to auto-fill based on questionnaire responses.
In Dubsado (setting up contract automation):
- Go to Documents → New Document → Contract
- Write your standard contract language
- Insert smart fields where information should auto-populate
Instead of typing “Client Name,” you insert {{contact.first_name}} {{contact.last_name}}
For project scope, insert {{form.project_description}}
For rates, insert {{form.budget}}
Essential contract elements for your client onboarding template:
- Scope of work (be specific—scope creep is expensive)
- Payment terms (how much, when, penalties for late payment)
- Timeline and milestones
- Revision policy (how many rounds are included)
- Kill fee clause (what happens if they cancel mid-project)
- Intellectual property rights (who owns the work)
- Confidentiality terms (if needed)
Send the contract directly through Dubsado for real-time signature notifications. Third-party e-signature tools like DocuSign work too, but keeping everything in one client management system reduces moving parts.
Step 3: Setting Up Your Automation Workflow
This is where the magic happens.
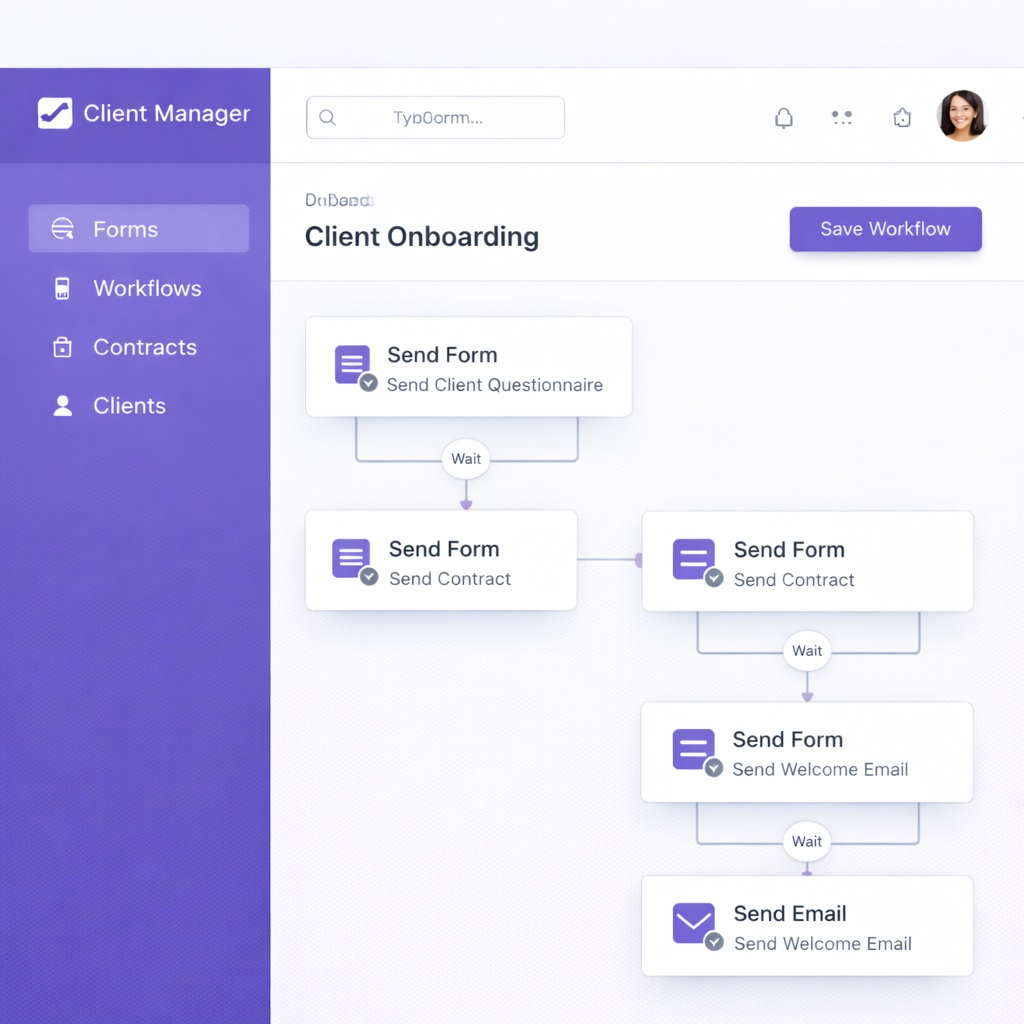
In Dubsado (building your automated workflow):
- Go to Workflows → New Workflow
- Name it: “Automated Client Onboarding“
- Set your trigger: “When contact form is submitted, start this workflow“
Now build the automated sequence:
Action 1 – Immediately: Send Welcome Email #1
Template:
Subject: Thanks for reaching out! Here's what happens next

Hey [Name]!

Really excited about [Project Type]—this is exactly the kind of work I love doing.

Here's what happens next:
1. You'll get a quick questionnaire in about 2 minutes (takes 5 minutes to fill out)
2. Once I receive your answers, I'll send over a proposal by end of day tomorrow
3. If it looks good, we can start as soon as [Date]

In the meantime, here's a guide to my process: [PDF link]

Looking forward to working together!

[Your Name]
Action 2 – 2 minutes later: Send the intake questionnaire
Subject: “Quick Questions to Get Started – [Your Name]”
Action 3 – If questionnaire completed within 48 hours: Auto-send the personalized contract
Message:
Hey [Name],

Based on what you've shared, here's our agreement. Once signed, we'll kick things off immediately.

[Contract link]

Questions? Just reply to this email.

[Your Name]
Action 4 – If questionnaire NOT completed after 3 days: Send a friendly nudge
Hey [Name],

Just wanted to make sure my questionnaire didn't end up in spam. Here's the link again—takes about 5 minutes to complete: [Link]

No pressure if the timing isn't right. Just let me know!

[Your Name]
Action 5 – When contract is signed: Three things happen simultaneously
- Send your welcome packet (brand guidelines, communication preferences, project timeline)
- Create their project folder structure in your file system
- Send yourself a notification that they’re onboarded and ready
Action 6 – When contract is signed (1 day delay): Send “We’re Starting Tomorrow” email
Hey [Name],

We're officially starting tomorrow! Here's what to expect in the first week:

- Monday: I'll send initial concepts/drafts
- Wednesday: Check-in call (you should have received calendar invite)
- Friday: Revised version based on your feedback

Everything will be available in your project portal: [Link]

Questions anytime—just email or comment in the portal.

Excited to get started!

[Your Name]
Conditional paths:
If someone doesn’t complete the questionnaire in 7 days, the workflow marks them as “Cold Lead” and removes them from the active sequence. You’re not chasing ghosts.
Step 4: Building Your Client Portal
The client portal is their central hub for everything related to their project.
In Dubsado, customize what they see:
Dashboard
- Overview of project status
- Upcoming milestones
- Recent messages
Files
- Shared folder for deliverables
- Brand assets
- Reference materials
- Upload capability for them too
Scheduler
- Embedded calendar for booking check-in calls
- No email tennis needed
Invoices
- Current and past invoices in one place
- Direct payment capability
Forms
- Additional information requests mid-project
- Dropped in portal instead of email where it gets buried
Process Guide
- Page explaining your workflow
- Typical timelines
- How to get the best results from your collaboration
The portal creates a perception of professionalism that justifies premium rates. It also dramatically reduces “Where’s that file?” and “How do I pay you?” messages.
Step 5: Personalizing the Automation
Here’s the crucial part: automation handles logistics, but your personality comes through in the messaging.
Don’t use bland corporate language:
❌ Bad automated message: “Thank you for your inquiry. Please complete the attached questionnaire at your earliest convenience. We look forward to working with you.”
✅ Good automated message: “Hey [Name]! Really excited about [Project Type]—this is exactly the kind of work I love doing. I’ve put together a quick questionnaire (5 minutes, promise) to make sure I understand exactly what you need. Once you fill that out, I’ll send over a proposal by end of day tomorrow. Sound good?”
The second version is conversational, enthusiastic, and sets clear expectations. It’s still automated, but it doesn’t feel robotic.
Pro tip: Add a short Loom video to your welcome email. Record yourself:
- Welcoming them
- Showing your face
- Explaining the next steps
It takes five minutes to record and can be reused for every new client. Suddenly your automation feels deeply personal.
Time Savings Breakdown
Let’s do the math on a freelancer who brings on four new clients monthly:
Manual process:
- Creating and sending questionnaire: 15 minutes
- Following up on incomplete responses: 20 minutes
- Customizing contract: 25 minutes
- Contract negotiation back-and-forth: 30 minutes
- Chasing signature: 15 minutes
- Creating project folders: 10 minutes
- Sending welcome materials: 10 minutes
- Total per client: 2 hours 5 minutes
- Monthly total: 8 hours 20 minutes
Automated process:
- Reviewing completed questionnaire: 5 minutes
- Approving auto-generated contract: 3 minutes
- Checking they’re set up in portal: 2 minutes
- Total per client: 10 minutes
- Monthly total: 40 minutes
Time saved: 7 hours 40 minutes per month, or nearly 2 hours per week
If you onboard more than four clients monthly, multiply that savings. At six new clients, you’re saving 11+ hours monthly.
Setup time investment: About 90 minutes to create forms, templates, and workflow. Maybe another 30 minutes tweaking after your first few clients go through it.
Cost: $0 if you have three or fewer active clients at a time. $20/month for Dubsado’s full plan. That’s less than half an hour of billable work for most freelancers.
Common Pitfalls and Solutions
“My clients won’t use the portal”
They will if you make it their easiest option:
- Don’t give them alternatives
- When they email asking for a file, respond: “Everything’s in your portal! Here’s the direct link: [URL]”
- After two times, they learn
“The automation feels too rigid for custom projects”
Create different onboarding sequences for different project types:
- Website clients get different questions than consulting clients
- The automation adapts, it doesn’t force everyone through one path
“What if they have questions the form doesn’t cover?”
- Include an open-ended question field
- Your welcome email should invite them to reply with anything unclear
- Automation doesn’t mean unavailable—it means efficient
“I tried automation before and clients complained”
Usually that means automated messages sounded robotic:
- Go back through every email your system sends
- Read them out loud
- Would you send this to a friend?
- If not, rewrite it warmer
- Use contractions, casual language, your actual voice
The goal isn’t to remove yourself from the process. It’s to remove the tedious parts so when you do interact with clients, it’s meaningful. They don’t remember that your questionnaire was automated. They remember that you understood their needs and delivered great work.
What’s Coming in Part 2
You’ve just automated client onboarding—saving yourself nearly 2 hours per week and making a professional first impression that justifies premium rates.
But we’re only getting started.
In Part 2, dropping [day of week], you’ll discover how to automate:
- Invoicing and payment reminders (Automation #2) – Never chase a payment manually again. Set up automated reminder sequences that get you paid 14 days faster on average.
- Meeting scheduling (Automation #3) – Eliminate the 8-email chains to book one call. Your Calendly link becomes your secret weapon for looking busy and professional.
- Project status updates (Automation #4) – Build a client dashboard that updates itself in real-time. Stop writing “Here’s where we’re at” emails every three days.
Plus, I’ll show you the exact Zapier workflows that connect these three automations into one seamless system.
→ Click here to continue to Part 2
Your Action Step Before Part 2
Don’t just read and move on. Pick ONE piece of this automation to implement before Part 2 drops.
If you have 30 minutes: Set up a Dubsado or HoneyBook account and create your intake form. Just the form, nothing else. Get it live.
If you have 60 minutes: Create your intake form AND your contract template with smart fields. Test it by filling it out yourself.
If you have 90 minutes: Build the entire workflow from this article. You’ll have client onboarding fully automated before Part 2 even arrives.
The freelancers who transform their businesses aren’t the ones with perfect systems. They’re the ones who implement imperfectly and iterate.
Which option are you choosing? Drop a comment below and tell me:
- Just the form (30 min)
- Form + contract (60 min)
- Full workflow (90 min)
I read every comment and often jump in with specific tips for your situation.


